- Details
- Written by: Stanko Milosev
- Category: C#
- Hits: 6731
<?xml version="1.0" encoding="utf-8" ?>
<configuration>

  <configSections>
    <section name="links" type="System.Configuration.NameValueSectionHandler">
    </section>
  </configSections>

  <links>
      <add key="link1" value="http://www.milosev.com/csharp/" />
      <add key="link2" value="http://milosev.com/asp-net-mvc-3" />
  </links>

  <appSettings>
      <add key="homePage" value="http://milosev.com/" />
  </appSettings>

    <startup>
        <supportedRuntime version="v4.0" sku=".NETFramework,Version=v4.6.1" />
    </startup>
</configuration>
.NET code:
using System;
using System.Collections.Specialized;
using System.Configuration;

namespace CustomConfig
{
    class Program
    {
        static void Main(string[] args)
        {
            NameValueCollection links = ConfigurationManager.GetSection("links") as NameValueCollection;
            string homePage = ConfigurationManager.AppSettings.Get("homePage");

            Console.WriteLine("Home page: " + homePage);

            foreach (string link in links)
            {
                Console.WriteLine("Link: " + links.Get(link));
            }

            Console.WriteLine("Press any key...");
            Console.ReadKey();
        }
    }
}
In reference list you will need to add System.Configuration.
POI:
  <configSections>
    <section name="links" type="System.Configuration.NameValueSectionHandler">
    </section>
  </configSections>
Here is more about configSection.
Also notice line:
Console.WriteLine("Link: " + links.Get(link));
- Details
- Written by: Stanko Milosev
- Category: C#
- Hits: 6792
One my example of interpolated string (taken from here):
string name = "stanko";
DateTime hours = DateTime.Now;
Console.WriteLine($"Name = {name}, hours = {hours:hh}");
Console.ReadKey();
Composite string:
string name = "stanko";
Console.WriteLine("Name = {0}, hours = {1:hh}", name, DateTime.Now);
Console.ReadKey();
According to Microsoft:
Interpolated string are easier to understand than a composite format string.
- Details
- Written by: Stanko Milosev
- Category: C#
- Hits: 6403
To assign IEnumerable to a new instance of IEnumerable, you will need ToList method. Here is an example:
IEnumerable instanceOne;
IEnumerable instanceTwo;

List instanceListOne = new List();

instanceListOne.Add("a");
instanceListOne.Add("b");

instanceOne = instanceListOne;
instanceTwo = instanceOne;

instanceListOne.Add("c");

foreach (string instance in instanceTwo)
{
	Console.WriteLine(instance);
}

Console.WriteLine("Press any key");
Console.ReadKey();

instanceTwo = instanceOne.ToList();
instanceListOne.Add("d");

foreach (string instance in instanceTwo)
{
	Console.WriteLine(instance);
}

Console.WriteLine("Press any key");
Console.ReadKey();
Notice first:
instanceListOne.Add("a");
instanceListOne.Add("b");

instanceOne = instanceListOne;
instanceTwo = instanceOne;
Then:
instanceListOne.Add("c");
I added firs "a" and "b" to instanceListOne, I assigned instanceListOne to instanceOne, and then I assigned instanceOne to instanceTwo, after that I added "c" to instanceListOne, then I went through instanceTwo and result is:
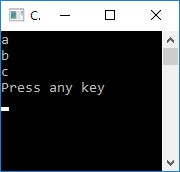
"c" is displayed also in instanceTwo.
Now to have two separate instances of IEnumerable, we need something like:
instanceTwo = instanceOne.ToList();
After that I did something like:
instanceListOne.Add("d");
Result will be still as in previous picture, "d" is not added to instanceTwo, since now we really have separate instances.
Example download from here.
- Details
- Written by: Stanko Milosev
- Category: C#
- Hits: 6915
IComparer example, with numbers first, and empty strings at the end:
using System;
using System.Collections;
using System.Collections.Generic;
using System.Linq;

namespace IComparer
{
    class Program
    {
        public class myCaseInsensitiveComparer : IComparer
        {
            public int Compare(string x, string y)
            {
                bool isXnumeric = int.TryParse(x, out var xInt);
                bool isYnumeric = int.TryParse(y, out var yInt);

                if (string.IsNullOrWhiteSpace(x) && string.IsNullOrWhiteSpace(y))
                {
                    return 0;
                }

                if (string.IsNullOrWhiteSpace(x))
                {
                    return 1;
                }

                if (string.IsNullOrWhiteSpace(y))
                {
                    return -1;
                }

                if (isXnumeric && isYnumeric)
                {
                    return xInt.CompareTo(yInt);
                }

                return string.Compare(x, y, StringComparison.OrdinalIgnoreCase);
            }
        }

        static void Main(string[] args)
        {
            string[] words = { "1", "a", "A", "", "b", "", "B", "C", "c", "", "", "3" };
            IOrderedEnumerable sortedWords = words.OrderBy(a => a, new myCaseInsensitiveComparer());

            foreach (var sortedWord in sortedWords)
            {
                Console.WriteLine(sortedWord);
            }

            Console.WriteLine("Press any key...");
            Console.ReadKey();
        }
    }
}
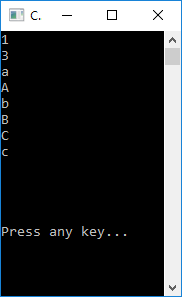
Result should be something like:
Source you can download from here.