- Details
- Written by: Stanko Milosev
- Category: WPF
- Hits: 26700
Both of these examples are with default value, you will find it in the constructor of model "Hello world!"
XAML datacontext
Add new WPF application project, add new model like:
namespace HelloWorldDataContext
{
    public class HelloWorldDataContextModel
    {
        public string HelloWorld { get; set; }

        public HelloWorldDataContextModel()
        {
            HelloWorld = "Hello world!";
        }
    }
}
Then XAML:
<Window x:Class="HelloWorldDataContext.MainWindow"
        xmlns="http://schemas.microsoft.com/winfx/2006/xaml/presentation"
        xmlns:x="http://schemas.microsoft.com/winfx/2006/xaml"
        xmlns:local="clr-namespace:HelloWorldDataContext"
        Title="MainWindow" Height="350" Width="525">
    <Window.Resources>
        <local:HelloWorldDataContextModel x:Key="HelloWorldDataContext" />
    </Window.Resources>
    <Grid DataContext="{StaticResource HelloWorldDataContext}">
        <TextBox HorizontalAlignment="Left" Height="23" Margin="222,127,0,0" TextWrapping="Wrap" Text="{Binding HelloWorld}" VerticalAlignment="Top" Width="120"/>
    </Grid>
</Window>
Important lines in XAML on which you should take care are:
xmlns:local="clr-namespace:HelloWorldDataContext"
Where name space is declared in model like:
namespace HelloWorldDataContext
<local:HelloWorldDataContextModel x:Key="HelloWorldDataContext" />
<Grid DataContext="{StaticResource HelloWorldDataContext}">
Example project you can download from here.
Programmatically setting datacontext
XAML:
<Window x:Class="ProgramaticallyDataContext.MainWindow"
        xmlns="http://schemas.microsoft.com/winfx/2006/xaml/presentation"
        xmlns:x="http://schemas.microsoft.com/winfx/2006/xaml"
        Title="MainWindow" Height="350" Width="525">
    <Grid>
        <TextBox HorizontalAlignment="Left" Height="23" Margin="147,78,0,0" TextWrapping="Wrap" Text="{Binding HelloWorld}" VerticalAlignment="Top" Width="120"/>
    </Grid>
</Window>
Test Model is same like in above example, code behind (MainWindow.xaml.cs) is like:
public MainWindow()
{
	InitializeComponent();

	HelloWorldDataContextModel objHW = new HelloWorldDataContextModel();
	objHW.HelloWorld = "Hello world";
	this.DataContext = objHW;
}
Example you can download from here.
- Details
- Written by: Stanko Milosev
- Category: WPF
- Hits: 5684
All you need is one XAML and two text boxes. So here goes XAML:
<Window x:Class="WpfApplication3.MainWindow"
        xmlns="http://schemas.microsoft.com/winfx/2006/xaml/presentation"
        xmlns:x="http://schemas.microsoft.com/winfx/2006/xaml"
        Title="MainWindow" Height="350" Width="525">
    <Grid>
        <TextBox HorizontalAlignment="Left" Height="23" Margin="96,91,0,0" TextWrapping="Wrap" Text="{Binding Path=Text, ElementName=myTest}" VerticalAlignment="Top" Width="120"/>
        <TextBox HorizontalAlignment="Left" Height="23" Margin="120,200,0,0" TextWrapping="Wrap" Text="TextBox" VerticalAlignment="Top" Width="120" x:Name="myTest"/>
    </Grid>
</Window>
- Details
- Written by: Stanko Milosev
- Category: WPF
- Hits: 5231
XAML:
<Window x:Class="WpfApplication2.MainWindow"
        xmlns="http://schemas.microsoft.com/winfx/2006/xaml/presentation"
        xmlns:x="http://schemas.microsoft.com/winfx/2006/xaml"
        Title="MainWindow" Height="350" Width="525">
    <Grid>
        <TextBox x:Name="t1" HorizontalAlignment="Left" Height="23" Margin="101,43,0,0" TextWrapping="Wrap" Text="TextBox" VerticalAlignment="Top" Width="120"/>
        <TextBox x:Name="t2" HorizontalAlignment="Left" Height="23" Margin="101,91,0,0" TextWrapping="Wrap" Text="TextBox" VerticalAlignment="Top" Width="120"/>
    </Grid>
</Window>
Code:
        public MainWindow()
        {
            InitializeComponent();
            Binding binding = new Binding();
            binding.Source = t1;
            binding.Path = new PropertyPath(TextBox.TextProperty);
            BindingOperations.SetBinding(t2, TextBox.TextProperty, binding);
        }
- Details
- Written by: Stanko Milosev
- Category: WPF
- Hits: 5465
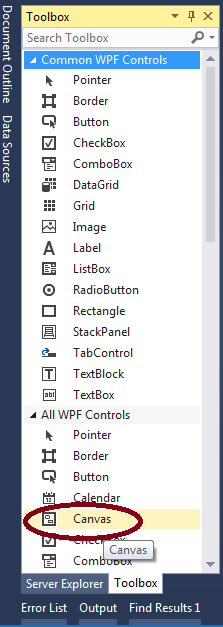
First add a canvas:
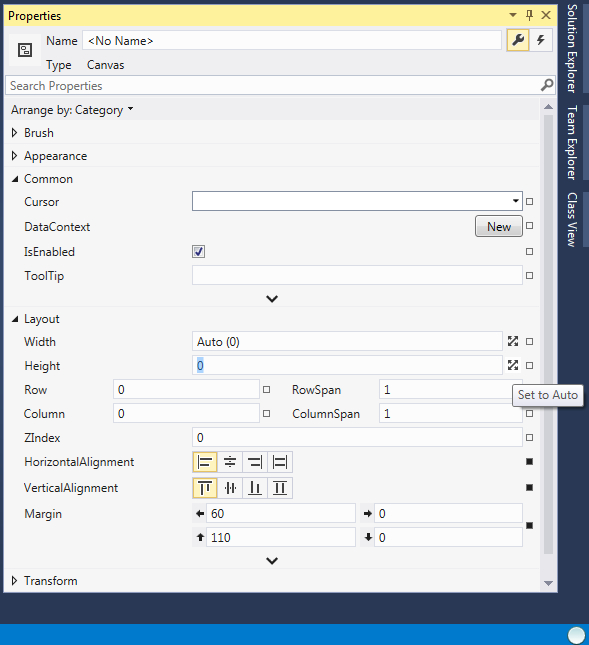
Set width and height to auto:
Add a button.
Now comes a tricky part, at least for me, since I don't know how to delete margins from Visual Studio GUI, so I had to do it manually from XAML. So, here is my XAML:
<Window x:Class="DragNdrop.MainWindow"
        xmlns="http://schemas.microsoft.com/winfx/2006/xaml/presentation"
        xmlns:x="http://schemas.microsoft.com/winfx/2006/xaml"
        Title="MainWindow" Height="350" Width="525">
    <Grid>
        <Canvas Margin="20" HorizontalAlignment="Left" VerticalAlignment="Top">
            <Button Content="Button"
                    PreviewMouseLeftButtonDown="Button_PreviewMouseLeftButtonDown"
                    PreviewMouseLeftButtonUp="Button_PreviewMouseLeftButtonUp"
                    PreviewMouseMove="Button_PreviewMouseMove"/>
        </Canvas>
    </Grid>
</Window>
Notice that margins from button node are deleted, and margin is equal 20 on canvas (Margin="20"), otherwise button will be away from mouse pointer.
Code looks like this:
public partial class MainWindow : Window
{
	private double FirstXPos;
	private double FirstYPos;
	private double FirstArrowXPos;
	private double FirstArrowYPos;
	private object MovingObject;
	public MainWindow()
	{
		InitializeComponent();
	}

	private void Button_PreviewMouseLeftButtonDown(object sender, MouseButtonEventArgs e)
	{
		FirstXPos = e.GetPosition(sender as Control).X;
		FirstYPos = e.GetPosition(sender as Control).Y;
		FirstArrowXPos = e.GetPosition((sender as Control).Parent as Control).X - FirstXPos - 20;
		FirstArrowYPos = e.GetPosition((sender as Control).Parent as Control).Y - FirstYPos - 20;
		MovingObject = sender;
	}

	private void Button_PreviewMouseLeftButtonUp(object sender, MouseButtonEventArgs e)
	{
		MovingObject = null;
	}

	private void Button_PreviewMouseMove(object sender, MouseEventArgs e)
	{
		if (e.LeftButton == MouseButtonState.Pressed && sender == MovingObject)
		{
			(sender as Control).SetValue(Canvas.LeftProperty,
				 e.GetPosition((sender as Control).Parent as Control).X - FirstXPos - 20);

			(sender as Control).SetValue(Canvas.TopProperty,
				 e.GetPosition((sender as Control).Parent as Control).Y - FirstYPos - 20);
		}
	}
}
Code you can download from here, dirty as usual and made in VS 2013