- Details
- Written by: Stanko Milosev
- Category: WPF
- Hits: 16662
Let's first add RelayCommand class:
class RelayCommand: ICommand
{
	private Action<object> _action;

	public RelayCommand(Action<object> action)
	{
		_action = action;
	}

	public bool CanExecute(object parameter)
	{
		return true;
	}

	public void Execute(object parameter)
	{
		if (parameter != null)
		{
			_action(parameter);
		}
		else
		{
			_action("Hello world");
		}
	}

	public event EventHandler CanExecuteChanged;
}
ICommand is an interface, and automatically you will receive methods which you have to implement. Now "click model":
public class MVVMButtonClickViewModel
{
	public MVVMButtonClickViewModel()
	{
		MVVMClick = new RelayCommand(new Action<object>(ShowMessage));
	}

	private ICommand m_ButtonCommand;

	public ICommand MVVMClick
	{
		get { return m_ButtonCommand; }
		set { m_ButtonCommand = value; }
	}

	public void ShowMessage(object obj)
	{
		MessageBox.Show("Test");
	}

}
and XAML:
<Window x:Class="MVVMButtonClick.MainWindow"
        xmlns="http://schemas.microsoft.com/winfx/2006/xaml/presentation"
        xmlns:x="http://schemas.microsoft.com/winfx/2006/xaml"
        xmlns:local="clr-namespace:MVVMButtonClick.ViewModel"
        Title="MainWindow" Height="350" Width="525">
    <Window.DataContext>
        <local:MVVMButtonClickViewModel />
    </Window.DataContext>
    <Grid>
        <Button Content="Button" HorizontalAlignment="Left" Margin="247,134,0,0" VerticalAlignment="Top" Width="75" Command="{Binding MVVMClick}"/>
    </Grid>
</Window>
As you can see, in button node, we have attribute like: Command="{Binding MVVMClick}, and of course don't forget to add DataContext, like:
    <Window.DataContext>
        <local:MVVMButtonClickViewModel />
    </Window.DataContext>
Example you can download from here.
- Details
- Written by: Stanko Milosev
- Category: WPF
- Hits: 5717
How to have button stretched over all window width: XAML:
<Window x:Class="DIexamples.MainWindow"
        xmlns="http://schemas.microsoft.com/winfx/2006/xaml/presentation"
        xmlns:x="http://schemas.microsoft.com/winfx/2006/xaml"
        Title="MainWindow" Height="350" Width="525">
    <Grid>
        <Grid.ColumnDefinitions>
            <ColumnDefinition Width="*" />
        </Grid.ColumnDefinitions>
        <Button Content="Button" Margin="0,23,0,0" VerticalAlignment="Top" />
        <Button Content="Button" Margin="0,0,0,0" VerticalAlignment="Top" />
    </Grid>
</Window>
Important lines to notice are:
<Grid.ColumnDefinitions>
	<ColumnDefinition Width="*" />
</Grid.ColumnDefinitions>
And attribute: Margin="0,23,0,0"
- Details
- Written by: Stanko Milosev
- Category: WPF
- Hits: 6491
Start new WPF application. Add TreeView control from toolbox.
Add one label.
My XAML looks like this:
<Window x:Class="MVVMtreeView.MainWindow"
        xmlns="http://schemas.microsoft.com/winfx/2006/xaml/presentation"
        xmlns:x="http://schemas.microsoft.com/winfx/2006/xaml"
        Title="MainWindow" Height="350" Width="525">
    <Grid>
        <TreeView HorizontalAlignment="Left" Height="206" Margin="10,10,0,0" VerticalAlignment="Top" Width="497"/>
        <Label Content="Label" HorizontalAlignment="Left" Margin="10,284,0,0" VerticalAlignment="Top" RenderTransformOrigin="0.421,0.462" Width="497"/>

    </Grid>
</Window>
Then add model, I called it TreeViewModel, and it looks like this:
namespace MVVMtreeView
{
    public class TreeViewModel
    {
        public List<string> TreeViewModels { get; set; }

        public TreeViewModel()
        {
            TreeViewModels = new List<string>();
            TreeViewModels.Add("test");
        }
    }
}
In "code behind", in MainWindow.xaml.cs, in MainWindow method, add line DataContext = new TreeViewModel(); so, in my case MainWindow.xaml.cs looks like this:
namespace MVVMtreeView
{
    ///
    /// Interaction logic for MainWindow.xaml
    ///
    public partial class MainWindow : Window
    {
        public MainWindow()
        {
            InitializeComponent();
            DataContext = new TreeViewModel();
        }
    }
}
Now, bind tree view to a model, that means in the XAML (in my case MainWindow.xaml), add ItemsSource="{Binding Path=TreeViewModels}", I also add name to a tree view, then bind label content, so now my XAML looks like this:
<Window x:Class="MVVMtreeView.MainWindow"
        xmlns="http://schemas.microsoft.com/winfx/2006/xaml/presentation"
        xmlns:x="http://schemas.microsoft.com/winfx/2006/xaml"
        Title="MainWindow" Height="350" Width="525">
    <Grid>
        <TreeView Name="tv" ItemsSource="{Binding Path=TreeViewModels}"  HorizontalAlignment="Left" Height="206" Margin="10,10,0,0" VerticalAlignment="Top" Width="497"/>
        <Label Content="{Binding ElementName=tv, Path=SelectedItem}" HorizontalAlignment="Left" Margin="10,284,0,0" VerticalAlignment="Top" RenderTransformOrigin="0.421,0.462" Width="497"/>

    </Grid>
</Window>
Example you can download from here.
- Details
- Written by: Stanko Milosev
- Category: WPF
- Hits: 6129
So, here I will just write one small and working example of dependency property, but this doesn't mean that I understand them :)
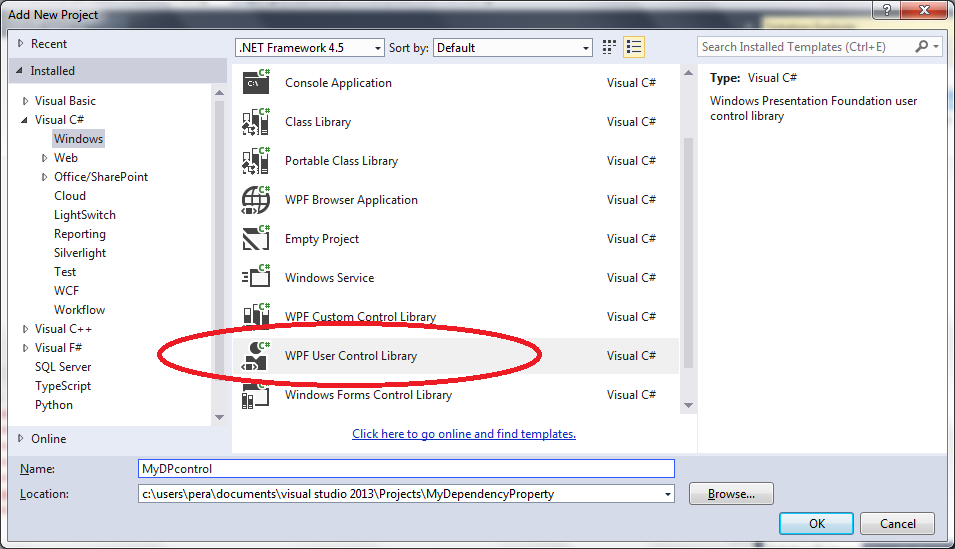
First create new project, and then to that solution add new user control, like on pictures:
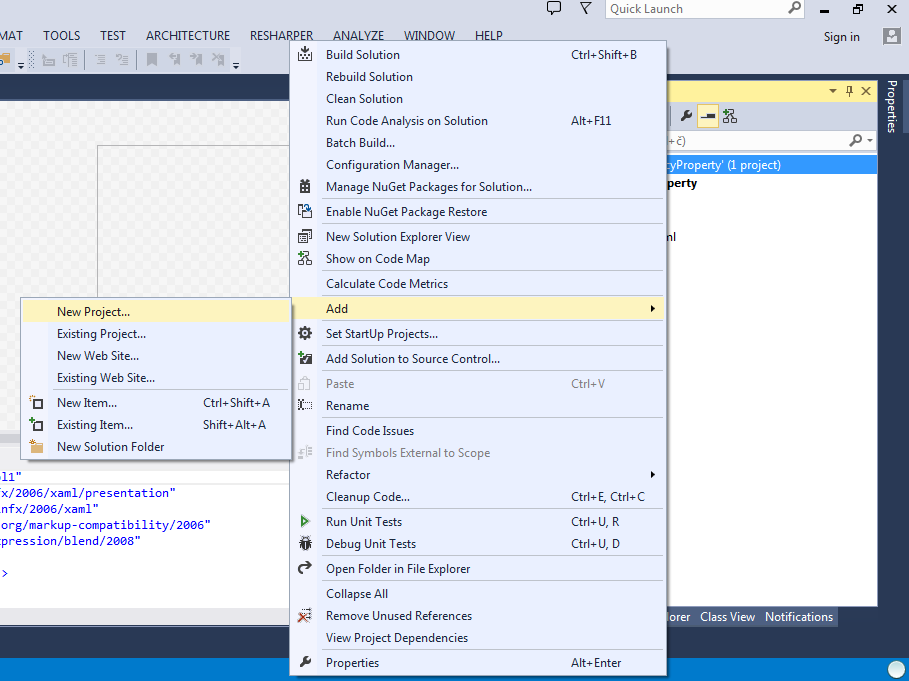
Now add user control:
Now, go to "code behind", like on picture:
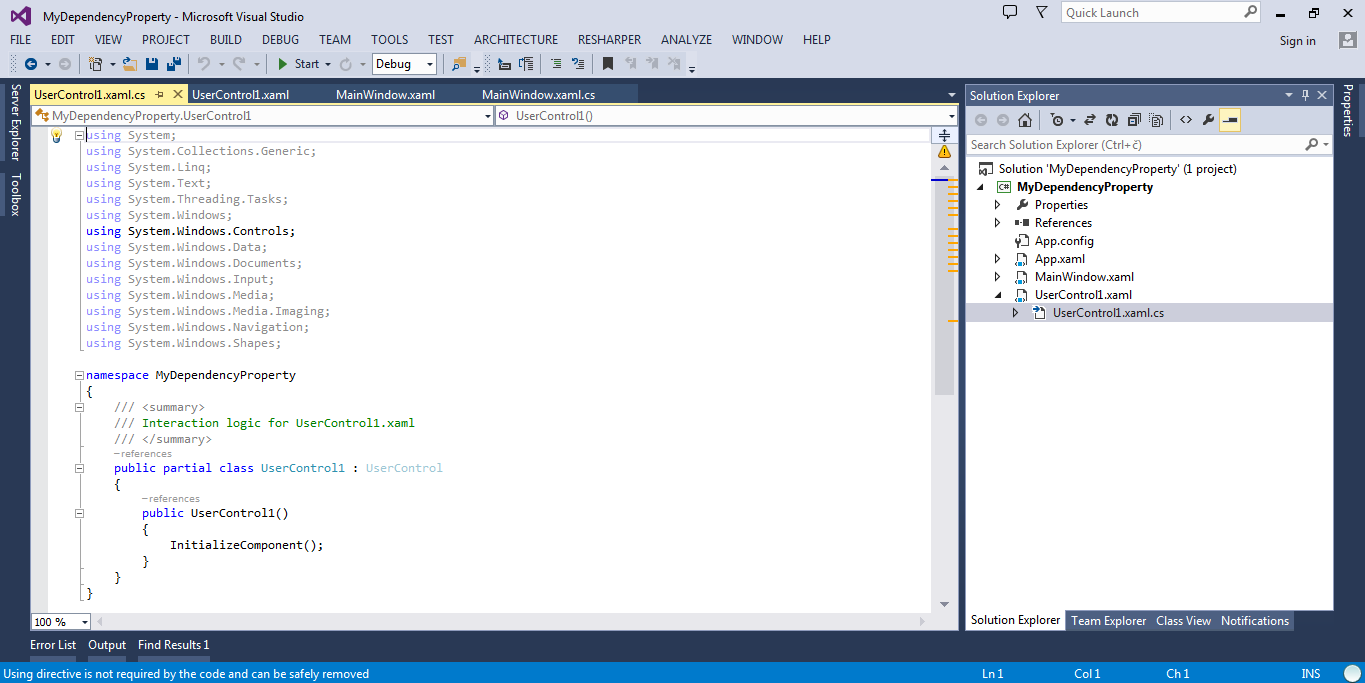
public partial class UserControl1 : UserControl
{
	public UserControl1()
	{
		InitializeComponent();
	}

	public static readonly DependencyProperty MyCustomProperty =
		DependencyProperty.Register("MyCustom", typeof (string), typeof (UserControl1),
			new FrameworkPropertyMetadata(MyCustomChanged));

	private static void MyCustomChanged(DependencyObject depobj, DependencyPropertyChangedEventArgs e)
	{

	}

	public string MyCustom
	{
		get { return GetValue(MyCustomProperty) as string; }
		set { SetValue(MyCustomProperty, value); }
	}
}
After that go to your main application (MainWindow.xaml), and add following line to your XAML:
<myDependencyProperty:UserControl1 MyCustom="Test" HorizontalAlignment="Left" Height="100" Margin="121,62,0,0" VerticalAlignment="Top" Width="100" x:Name="MyTestUserControl1"/>
So your XAML should look like:
<Window x:Class="MyDependencyProperty.MainWindow"
        xmlns="http://schemas.microsoft.com/winfx/2006/xaml/presentation"
        xmlns:x="http://schemas.microsoft.com/winfx/2006/xaml"
        xmlns:myDependencyProperty="clr-namespace:MyDependencyProperty"
        Title="MainWindow" Height="350" Width="525">
    <Grid>
        <myDependencyProperty:UserControl1 MyCustom="Test"  HorizontalAlignment="Left" Height="100" Margin="121,62,0,0" VerticalAlignment="Top" Width="100" x:Name="MyTestUserControl1"/>
    </Grid>
</Window>
Note MyCustom="Test" - this is our new property which is of type string...