- Details
- Written by: Stanko Milosev
- Category: node.js
- Hits: 4919
Today I discovered stylelint, and here is my example how to use it on windows, since I was struggling with CLI in windows.
First to install stylelint I was using this command:
npm install stylelint
After that I installed standard configuration:
npm install stylelint-config-standard
After that step in folder ..\node_modules\stylelint-config-standard you can find file index.js, which I copy / pasted to folder ..\node_modules\.bin and renamed to stylelint.config.js
Then I went to folder ..\node_modules\.bin in command prompt, and wrote on CSS with empty rule, something like:
a {}
In command prompt executed:
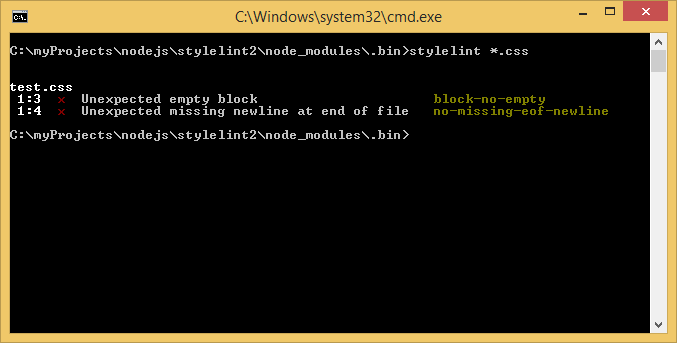
stylelint *.css
And voilà :

There is also possibility to use stylelint against less files, as explained here, but I didn't test it.
- Details
- Written by: Stanko Milosev
- Category: node.js
- Hits: 4758
One example of streaming videos using VidStreamer.js.
Server:
/*global require*/

var http = require("http");
var vidStreamer = require("vid-streamer");

var newSettings = {
    rootFolder: "C:/videoStreaming/videos/",
    rootPath: "videos/",
    forceDownload: false
};

var app = http.createServer(vidStreamer.settings(newSettings));
app.listen(3000);
Client:
<!DOCTYPE html>
<html>
<head lang="en">
    <meta charset="UTF-8">
    <title></title>
</head>
<body>
    <video autoplay>
        <source src="http://localhost:3000/videos/a.mp4" type="video/mp4">
    </video>
</body>
</html>
- Details
- Written by: Stanko Milosev
- Category: node.js
- Hits: 6903
Karma is test runner, that means that it can execute our tests which we wrote in Jasmine, for example.
First to install it, we need to install node.js. Installing is trivial, so I will not explain it, except that I needed to restart my computer, otherwise npm is not recognized...
Open command prompt and go to folder where your source is located, in my case that is C:\myProjects\js\myPhotoAlbum, you can see the project on my GitHub. Then Install karma:
npm install -g karma --save-dev

In my case I also installed karma command line interface:
npm install -g karma-cli --save-dev
Then, in root folder of my project I added karma config file (karma.config.js):
/*global module*/
module.exports = function(config) {
    "use strict";
    config.set({
        plugins: ['karma-chrome-launcher', 'karma-coverage', 'karma-jasmine'],
        frameworks: ['jasmine'],
        files: [
            'js/sm.namespaces.js',
            'js/sm.googleMaps.js',
            'js/sm.readEXIFdata.js',
            'js/sm.visualize.js',
            'js/start.js'
        ],

        // coverage reporter generates the coverage
        reporters: ['progress', 'coverage'],
        browsers: ['Chrome'],
        singleRun: true,

        preprocessors: {
            // source files, that you wanna generate coverage for
            // do not include tests or libraries
            // (these files will be instrumented by Istanbul)
            'js/**/*.js': ['coverage']
        },

        // optionally, configure the reporter
        coverageReporter: {
            type : 'html',
            dir : 'coverage/'
        }
    });
};
Here notice line:
plugins: ['karma-chrome-launcher', 'karma-coverage', 'karma-jasmine']
this means that we have to install:
karma-chrome-launcher
npm install karma-chrome-launcher --save-dev
karma-coverage:
npm install karma-coverage --save-dev
and karma-jasmine:
npm install karma-jasmine --save-dev
Also, if we add package file (package.json):
{
  "name": "myPhotoAlbum-Karma",
  "version": "0.0.1",
  "devDependencies": {
    "karma": "^0.12.31",
    "karma-chrome-launcher": "^0.1.7",
    "karma-coverage": "^0.2.7",
    "karma-jasmine": "^0.3.5",
    "karma-cli": "^0.0.4"
  }
}
Then all we have to do is:
npm install
and all our packages which we defined in our package.json will be added. More about package.json you can read here.
Then notice line:
singleRun: true
with that line we said that we want our test to be executed only once. Now we can execute Karma:
karma start karma.conf.js
After executing Karma you can see folder:
C:\myProjects\js\myPhotoAlbum\coverage\Chrome 40.0.2214 (Windows 8.1)
and if you open index.html you should see something like:

- Details
- Written by: Stanko Milosev
- Category: node.js
- Hits: 4977
One example of receiving messages for node.js. I was using nodejs-websocket module as WebSocket server.
My server looks like this:
var ws = require("nodejs-websocket")

var server = ws.createServer(function (conn) {
    console.log("New connection")
    conn.on("close", function (code, reason) {
        console.log("Connection closed")
    })

}).listen(8081)

setInterval(function () {
	console.log("Sending 'Test'");
	try {
		server.connections.forEach(function (con) {
				console.log("Sending 'Test'");
				con.sendText("Test");
		});
	} catch (e) {
		console.log('Error!');
		console.log(e);
	}
}, 1000);
Client looks like this:
window.onload = function () {

	function MyConnectionWrapper() {
		var self = this,
			createSocket = function () { return new WebSocket('ws://127.0.0.1:8081') },
			ws = createSocket();

			self.onopen = function (myFunc) {
				ws.onopen = myFunc;
			}

			self.onmessage = function (myFunc) {
				console.log('In self: ' + myFunc);
				ws.onmessage = myFunc;
			};
	}

	myConn = new MyConnectionWrapper();

	myConn.onmessage(function (myFunc) {
		console.log('In myConn: ' + myFunc);
	});
}
Here notice lines:
myConn = new MyConnectionWrapper();
myConn.onmessage(function (myFunc) {
console.log('In myConn: ' + myFunc);
});
With first line:
myConn = new MyConnectionWrapper();
we have created socket, because automatically following code is executed:
createSocket = function () { return new WebSocket('ws://127.0.0.1:8081') },
with that myConn became WebSocket, and with self we assigned onmessage method to myConn:
self.onmessage = function (myFunc) {
console.log('In self: ' + myFunc);
ws.onmessage = myFunc;
};
In this case myFunc will be function which we assigned like this:
myConn.onmessage(function (myFunc) {
console.log('In myConn: ' + myFunc);
});
Example download from here.
