- Details
- Written by: Stanko Milosev
- Category: Android
- Hits: 1881
First I have added fusedLocationClient as private member variable:
private lateinit var fusedLocationClient: FusedLocationProviderClientWhere FusedLocationProviderClient is imported from:
implementation 'com.google.android.gms:play-services-location:19.0.1'In onCreate I have initialized fusedLocationClient:
override fun onCreate(savedInstanceState: Bundle?) {
	super.onCreate(savedInstanceState)
	setContentView(R.layout.activity_main)
	fusedLocationClient = LocationServices.getFusedLocationProviderClient(this)
}
I need line like
fusedLocationClient.requestLocationUpdates(locationRequest, locationCallback, Looper.getMainLooper())For that I need locationRequest and locationCallback
Both locationRequest and locationCallback I have declared as member variables:
private lateinit var locationCallback: LocationCallback
private lateinit var locationRequest: LocationRequest
locationRequest:
locationRequest = LocationRequest.create().apply {
	interval = 5000
	fastestInterval = 50000
	smallestDisplacement = 170f // 170 m = 0.1 mile
	priority = LocationRequest.PRIORITY_HIGH_ACCURACY
}
locationCallback:
locationCallback = object : LocationCallback() {
	override fun onLocationResult(locationResult: LocationResult) {
		locationResult ?: return

		if (locationResult.locations.isNotEmpty()) {
			// get latest location
			val location =
				locationResult.lastLocation
			if (location != null) {
				println(location.latitude.toString())
				println(location.longitude.toString())
			}
		}
	}
}
In app\src\main\AndroidManifest.xml I have added permissions:
<uses-permission android:name="android.permission.ACCESS_COARSE_LOCATION" />
<uses-permission android:name="android.permission.ACCESS_FINE_LOCATION" />
And check for permission:
if (ActivityCompat.checkSelfPermission(
		this,
		Manifest.permission.ACCESS_FINE_LOCATION
	) != PackageManager.PERMISSION_GRANTED && ActivityCompat.checkSelfPermission(
		this,
		Manifest.permission.ACCESS_COARSE_LOCATION
	) != PackageManager.PERMISSION_GRANTED
) {
	if (ActivityCompat.shouldShowRequestPermissionRationale(
			this as Activity,
			Manifest.permission.ACCESS_FINE_LOCATION
		)
	) {
		return
	} else {
		ActivityCompat.requestPermissions(
			this,
			arrayOf(
				Manifest.permission.ACCESS_FINE_LOCATION,
			)
			, 99
		)
	}
}
At the end my MainActivity.kt looks like:
package com.milosev.requestlocationupdates

import android.Manifest
import android.app.Activity
import android.content.pm.PackageManager
import androidx.appcompat.app.AppCompatActivity
import android.os.Bundle
import android.os.Looper
import android.view.View
import androidx.core.app.ActivityCompat
import com.google.android.gms.location.*

class MainActivity : AppCompatActivity() {
    private lateinit var fusedLocationClient: FusedLocationProviderClient
    private lateinit var locationCallback: LocationCallback
    private lateinit var locationRequest: LocationRequest

    override fun onCreate(savedInstanceState: Bundle?) {
        super.onCreate(savedInstanceState)
        setContentView(R.layout.activity_main)
        fusedLocationClient = LocationServices.getFusedLocationProviderClient(this)
    }

    fun requestLocationUpdatesClick(view: View) {

        if (ActivityCompat.checkSelfPermission(
                this,
                Manifest.permission.ACCESS_FINE_LOCATION
            ) != PackageManager.PERMISSION_GRANTED && ActivityCompat.checkSelfPermission(
                this,
                Manifest.permission.ACCESS_COARSE_LOCATION
            ) != PackageManager.PERMISSION_GRANTED
        ) {
            if (ActivityCompat.shouldShowRequestPermissionRationale(
                    this as Activity,
                    Manifest.permission.ACCESS_FINE_LOCATION
                )
            ) {
                return
            } else {
                ActivityCompat.requestPermissions(
                    this,
                    arrayOf(
                        Manifest.permission.ACCESS_FINE_LOCATION,
                    )
                    , 99
                )
            }
        }

        locationRequest = LocationRequest.create().apply {
            interval = 5000
            fastestInterval = 50000
            smallestDisplacement = 170f // 170 m = 0.1 mile
            priority = LocationRequest.PRIORITY_HIGH_ACCURACY
        }

        locationCallback = object : LocationCallback() {
            override fun onLocationResult(locationResult: LocationResult) {
                locationResult ?: return

                if (locationResult.locations.isNotEmpty()) {
                    // get latest location
                    val location =
                        locationResult.lastLocation
                    if (location != null) {
                        println(location.latitude.toString())
                        println(location.longitude.toString())
                    }
                }
            }
        }

        fusedLocationClient.requestLocationUpdates(locationRequest, locationCallback,
            Looper.getMainLooper())
    }
}
- Details
- Written by: Stanko Milosev
- Category: Android
- Hits: 1442
private fun writeFileOnInternalStorage(mcoContext: Context, sFileName: String?, sBody: String?) {
	val dir = File(mcoContext.getFilesDir(), "mydir")
	if (!dir.exists()) {
		dir.mkdir()
	}
	try {
		val gpxfile = File(dir, sFileName)
		val writer = FileWriter(gpxfile)
		writer.append(sBody)
		writer.flush()
		writer.close()
	} catch (e: Exception) {
		e.printStackTrace()
	}
}
- Details
- Written by: Stanko Milosev
- Category: Android
- Hits: 1928
 Open it and add a button:
 In activity_main.xml I have added android:onClick="getGps" so my activity_main.xml looks like:
<?xml version="1.0" encoding="utf-8"?>
<androidx.constraintlayout.widget.ConstraintLayout xmlns:android="http://schemas.android.com/apk/res/android"
    xmlns:app="http://schemas.android.com/apk/res-auto"
    xmlns:tools="http://schemas.android.com/tools"
    android:layout_width="match_parent"
    android:layout_height="match_parent"
    tools:context=".MainActivity">

    <TextView
        android:layout_width="wrap_content"
        android:layout_height="wrap_content"
        android:text="Hello World!"
        app:layout_constraintBottom_toBottomOf="parent"
        app:layout_constraintLeft_toLeftOf="parent"
        app:layout_constraintRight_toRightOf="parent"
        app:layout_constraintTop_toTopOf="parent" />

    <Button
        android:id="@+id/button"
        android:layout_width="wrap_content"
        android:layout_height="wrap_content"
        android:text="Button"
        android:onClick="getGps"
        tools:layout_editor_absoluteX="166dp"
        tools:layout_editor_absoluteY="441dp" />

</androidx.constraintlayout.widget.ConstraintLayout>
In build.gradle as I already explained here I have added Google Play services com.google.android.gms.location like this:
implementation 'com.google.android.gms:play-services-location:19.0.1'Now my build.gradle looks like:
plugins {
    id 'com.android.application'
    id 'org.jetbrains.kotlin.android'
}

android {
    compileSdk 32

    defaultConfig {
        applicationId "com.milosev.getgpslocation"
        minSdk 21
        targetSdk 32
        versionCode 1
        versionName "1.0"

        testInstrumentationRunner "androidx.test.runner.AndroidJUnitRunner"
    }

    buildTypes {
        release {
            minifyEnabled false
            proguardFiles getDefaultProguardFile('proguard-android-optimize.txt'), 'proguard-rules.pro'
        }
    }
    compileOptions {
        sourceCompatibility JavaVersion.VERSION_1_8
        targetCompatibility JavaVersion.VERSION_1_8
    }
    kotlinOptions {
        jvmTarget = '1.8'
    }
}

dependencies {

    implementation 'androidx.core:core-ktx:1.7.0'
    implementation 'androidx.appcompat:appcompat:1.4.1'
    implementation 'com.google.android.material:material:1.5.0'
    implementation 'androidx.constraintlayout:constraintlayout:2.1.3'
    implementation 'com.google.android.gms:play-services-location:19.0.1'
    testImplementation 'junit:junit:4.13.2'
    androidTestImplementation 'androidx.test.ext:junit:1.1.3'
    androidTestImplementation 'androidx.test.espresso:espresso-core:3.4.0'
}
In Android -> app -> manifests -> AndroidManifest.xml I added permissions like:
<uses-permission android:name="android.permission.ACCESS_COARSE_LOCATION" />
<uses-permission android:name="android.permission.ACCESS_FINE_LOCATION" />
In order to request permission I In Project -> app -> src -> main -> java -> com -> milosev -> getgpslocation -> MainActivity.kt I wrote:
if (ActivityCompat.checkSelfPermission(
		this,
		Manifest.permission.ACCESS_FINE_LOCATION
	) != PackageManager.PERMISSION_GRANTED && ActivityCompat.checkSelfPermission(
		this,
		Manifest.permission.ACCESS_COARSE_LOCATION
	) != PackageManager.PERMISSION_GRANTED
) {
	if (ActivityCompat.shouldShowRequestPermissionRationale(
			this,
			Manifest.permission.ACCESS_FINE_LOCATION
		)
	) {
		return
	} else {
		// No explanation needed, we can request the permission.
		requestLocationPermission()
	}
}
So my whole MainActivity.kt looks like:
package com.milosev.getgpslocation

import android.Manifest
import android.content.pm.PackageManager
import androidx.appcompat.app.AppCompatActivity
import android.os.Bundle
import android.view.View
import androidx.core.app.ActivityCompat
import com.google.android.gms.location.FusedLocationProviderClient
import com.google.android.gms.location.LocationServices

class MainActivity : AppCompatActivity() {
    private lateinit var fusedLocationClient: FusedLocationProviderClient

    override fun onCreate(savedInstanceState: Bundle?) {
        super.onCreate(savedInstanceState)
        setContentView(R.layout.activity_main)
        fusedLocationClient = LocationServices.getFusedLocationProviderClient(this)
    }

    fun getGps(view: View) {
        if (ActivityCompat.checkSelfPermission(
                this,
                Manifest.permission.ACCESS_FINE_LOCATION
            ) != PackageManager.PERMISSION_GRANTED && ActivityCompat.checkSelfPermission(
                this,
                Manifest.permission.ACCESS_COARSE_LOCATION
            ) != PackageManager.PERMISSION_GRANTED
        ) {
            if (ActivityCompat.shouldShowRequestPermissionRationale(
                    this,
                    Manifest.permission.ACCESS_FINE_LOCATION
                )
            ) {
                return
            } else {
                // No explanation needed, we can request the permission.
                requestLocationPermission()
            }
        }
        fusedLocationClient.lastLocation
            .addOnSuccessListener { location->
                if (location != null) {
                    // use your location object
                    // get latitude , longitude and other info from this
                }

            }
    }

    private fun requestLocationPermission() {
        ActivityCompat.requestPermissions(
            this,
            arrayOf(
                Manifest.permission.ACCESS_FINE_LOCATION,
            ),
            MY_PERMISSIONS_REQUEST_LOCATION
        )
    }

    companion object {
        private const val MY_PERMISSIONS_REQUEST_LOCATION = 99
        private const val MY_PERMISSIONS_REQUEST_BACKGROUND_LOCATION = 66
    }

}
With piece of code:
fusedLocationClient.lastLocation
.addOnSuccessListener { location->
	if (location != null) {
		// use your location object
		// get latitude , longitude and other info from this
	}
I am actually geting the location.
- Details
- Written by: Stanko Milosev
- Category: Android
- Hits: 2149
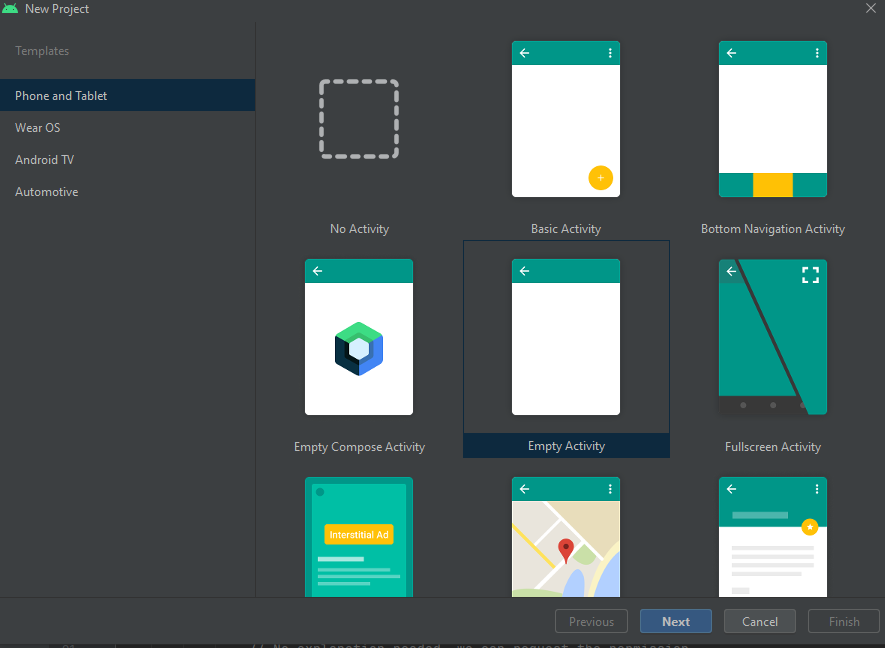
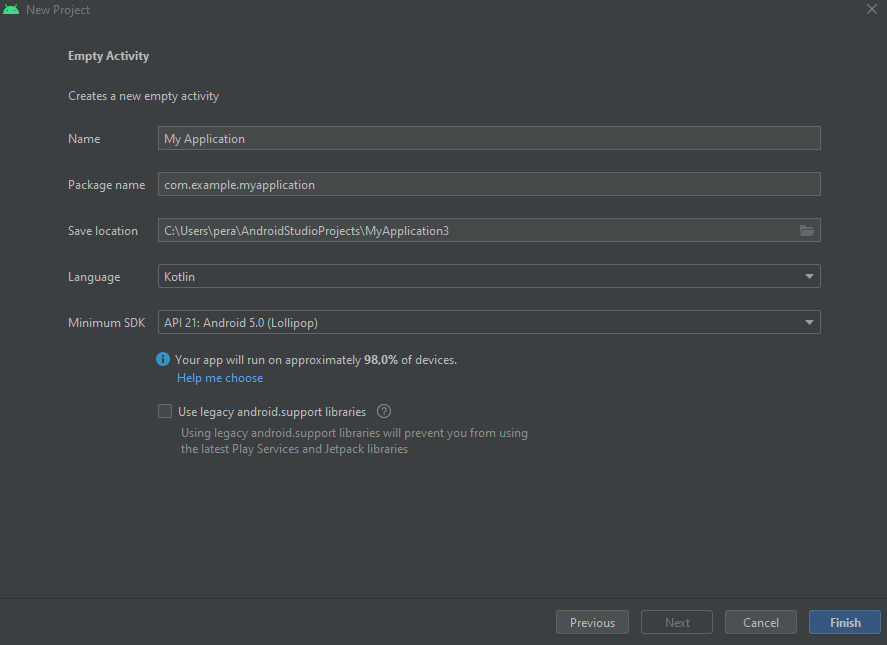
 In next step in my case I have choosen language Kotlin, Minimum SDK API 21:
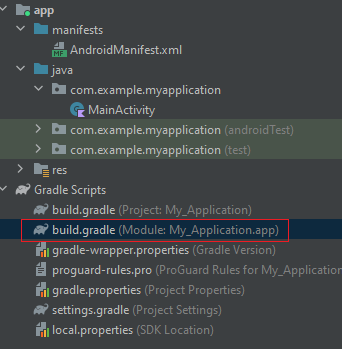
 In Android -> Gradle Scripts -> build.gradle:
 I have added:
implementation 'com.google.code.gson:gson:2.9.0'
Now my dependecies look like:
dependencies {
    implementation 'androidx.core:core-ktx:1.7.0'
    implementation 'androidx.appcompat:appcompat:1.4.1'
    implementation 'com.google.android.material:material:1.5.0'
    implementation 'androidx.constraintlayout:constraintlayout:2.1.3'
    testImplementation 'junit:junit:4.13.2'
    androidTestImplementation 'androidx.test.ext:junit:1.1.3'
    androidTestImplementation 'androidx.test.espresso:espresso-core:3.4.0'
    implementation 'com.google.code.gson:gson:2.9.0'
}
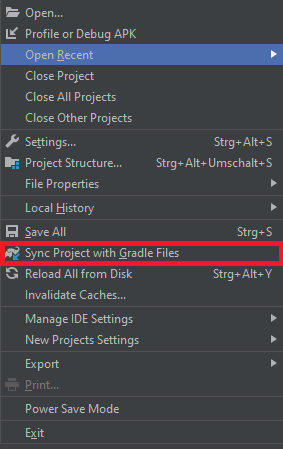
Go to File -> Sync Project with Gradle Files:
 In MainActivity write something like:
internal class Albums {
    var title: String? = null
    var message: String? = null
    var errors = arrayOf<String>()
    var total: String? = null
    var total_pages = 0
    var page = 0
    var limit: String? = null
}
and
val albums = Albums()
albums.title = "Free Music Archive - Albums"
albums.message = ""
albums.total = "11259"
albums.total_pages = 2252
albums.page = 1
albums.limit = "5"

val builder = GsonBuilder()
val gson: Gson = builder.create()
System.out.println(gson.toJson(albums))
My MainActivity now looks like:
package com.example.myapplication

import androidx.appcompat.app.AppCompatActivity
import android.os.Bundle
import com.google.gson.Gson
import com.google.gson.GsonBuilder

internal class Albums {
    var title: String? = null
    var message: String? = null
    var errors = arrayOf<String>()
    var total: String? = null
    var total_pages = 0
    var page = 0
    var limit: String? = null
}

class MainActivity : AppCompatActivity() {
    override fun onCreate(savedInstanceState: Bundle?) {
        super.onCreate(savedInstanceState)
        setContentView(R.layout.activity_main)

        val albums = Albums()
        albums.title = "Free Music Archive - Albums"
        albums.message = ""
        albums.total = "11259"
        albums.total_pages = 2252
        albums.page = 1
        albums.limit = "5"

        val builder = GsonBuilder()
        val gson: Gson = builder.create()
        System.out.println(gson.toJson(albums))
    }
}
